

Introduction
A bad car alternator is something you should not disregard as a car owner. When your engine stalls or your lights dim, it’s likely due to a bad alternator.
This small component is vital to running your car well, so you should respond on time. You should test your alternator immediately to avoid further problems. Thankfully, testing the alternator doesn’t cause any head-scratching. It remains a simple DIY even those inexperienced in mechanical tasks, like you, can do.
And to simplify the task further, here’s an easy guide you can follow.
Alternator Failure Symptoms
Since the alternator is a significant component, you’ll be able to tell if there’s something wrong with it. The symptoms of a bad alternator can be detected easily by the driver’s feel. Here are the common changes in your auto that may indicate a flawed alternator. See more alternator failure symptoms.
- Flashing dashboard warning light
Your instrument cluster can be a pain once it flashes a warning light. But you must recognize this as it can signify a bad alternator. Some dashboards will light on “GEN” or “ALT” as a warning for an alternator problem. In most cars, an illuminated battery-shaped icon indicates this problem.
- Dead battery
If you don’t have a functioning warning light, a dead battery may help. A dead battery is a strong indicator of a failing alternator, especially if the battery is somewhat new. This may mean that the alternator couldn’t charge it, which is not supposed to do. If you find out your alternator problems are due to a dead battery, you’re a bit unlucky. You may have to look for a new battery as your old one may already be fully depleted.
- Engine stalling
Engine stalling at any point may indicate different degrees and types of problems. One of which is a failing alternator. This issue has more to do with the alternator not properly charging the battery. If your battery is weak, it can affect the function of the spark plug or fuel injectors. This can cause the engine to misfire, stall, or crank slowly.
- Unresponsive electronic components
Fluctuations in battery output cause the responsiveness of electrical commands to dwindle. This affects the expected performance of your electrical components, like power windows. When a problematic alternator continues to run with inadequate charge, the changes become more pronounced. Sometimes, your air conditioning becomes weaker day by day.
- Dimmer lights
It’s not usual for your interior lights to suddenly go dimmer. Aside from possible connection problems, the battery’s inadequate power causes lights to dim. This problem should prompt you to test your alternator on time. The dimmer the light gets, the more depleted the battery is.
How To Test an Alternator?
While the problems caused by a bad alternator can be severe, testing it should be easy. You can let a professional mechanic do the testing, but DIY testing should be the key if you want a cheaper option.
Here is the step-by-step guide for successful DIY alternator testing.
Step 1: Pre-checking setup
Like in every mechanical testing, you must do your pre-checking work for safety and efficiency. So, before looking under the hood, ensure you have these pre-check requirements.
Tools needed:
- Digital multimeter or volt meter
- Rubber hose, 3 feet long
- Socket and wrench set
- Wheel chocks
- Protective glasses
Setting up your car:
- Proper parking of the vehicle on a leveled surface
- Turn the engine off
- Place your wheel chocks to secure the vehicle in place
- Wear protective glasses
- Open the hood
Step 2: Locate your car alternator
In most cars, the alternator sits in front of the engine. Its appearance immediately identifies it. It has a round, vented, metallic silver housing with copper wires peeking inside.
Once located, it is essential that you first check for loose connections. Sometimes, the problem causing similar bad alternator symptoms is not alternator-related. You can look for poor connections in the battery or nearby components. You can proceed to the next step if nothing seems out of place.
Step 3: Inspect the drive belt
A loose serpentine belt can cause a bad alternator. If the belt is not tightened to its specification, the alternator may not charge the battery.
To check for tightness, press on the belt between the pulleys. If you can press with too much movement, it means the belt is loose. Tighten the belt as needed before testing the alternator.
Step 4: Check engine noise
Turn on the engine. Listen for a squeaking or grinding sound from under the hood. The presence of such noise indicates a problem.
Grab the 3-foot-long rubber hose you’re told to prepare to check if the sound comes from the alternator. Use it as a stethoscope. With one end against your ear, put the other end on the alternator housing. If you hear the grinding noise too loud, it’s likely a failed bearing. Unfortunately, you need to replace your alternator with a new one.
Step 5: Testing with the engine off
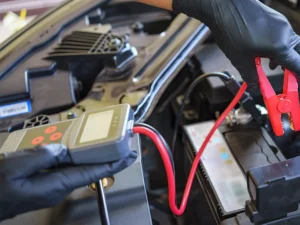
This time, you can test the alternator itself. First, turn the engine off again. Then, bring out your volt meter and set it to a direct current (DC) configuration. You will check the battery voltage here to see if any numbers are missing.
Clip the volt meter’s positive (+) connection to the battery’s positive terminal. Do the same with the volt reader and the battery’s negative (-) sides.
The voltage meter should read 12.5 volts. This is the “resting voltage” of a fully charged car battery when the engine is off.
Step 6: Testing with the engine on
Next, turn the engine back on and let electrical systems run. With the voltage meter connected the same way, compare the changes in voltage readings.
This time, the reading should be between 13.5 and 14.5 volts. This is the typical voltage rating when the engine is on.
Then, diagnose the battery further by turning on a few electrical switches. These may include the headlight switch, air conditioning, or the radio. Look for a voltage reduction reading when these systems are running.
Here’s what you need to remember to know if the alternator is faulty:
- The volt meter shows no reading change when the engine turns on or off.
- The reading does not fall between the least and maximum range of 13 to 15 volts when the engine runs.
Step 7: Finish the testing setup
Great job; you’re finished testing your car alternator. Now, finish your setup by turning the engine off first. Disconnect the volt meter from the battery terminals and close the hood.
Remember all your findings from which you’ll draw your conclusions.
Step 8: Draw your conclusion
Alternator testing is straightforward. The only headache is when you find your alternator to be faulty.
If you determine your alternator is in perfect shape, but the symptoms remain, you may have to bring your car to a mechanic. This may indicate more severe problems that need more careful professional care.
It is good for you if your alternator is intact and the symptoms are gone. You may have resolved some loose connections along the process.
But, if you ever find your alternator faulty, it’s better to bring it to a mechanic. Ask the professional if it can get repaired or needs complete replacement.
Conclusion
A car alternator’s expected lifespan is seven years or 80k to 150k miles. However, this doesn’t mean it will not fail below that lifespan unless it is properly maintained.
It is also essential to choose a reliable alternator manufacturer. Unitech manufactures alternators of all well-known brands and guarantees after-sales service. Contact us to get a quote.
Always remember that a faulty alternator does not only affect itself. If it’s failing, it could also harm the battery life and performance.
This can result in further damage to electrical systems and components. Therefore, it’s always best to maintain your alternator in its top-toe shape. And test it on time if symptoms start showing.